Tuesday, December 20, 2016

Why is the with_copy option critical when restoring a database configured with StretchDb

StretchDB is a new capability in SQL Server 2016 which provides the ability to effectively partition your data between warm and cold data, and more importantly allow SQL Server to automatically host that data in an Azure SQL Database.... sounds great in concept and in cases where you have a large amount of cold data which just needs to be queried and not updated (e.g. archived data for reporting).

Now, there is one critically thing you really need to be aware of and that is when it comes time to Restore or more specifically Migrate the on-premises database that is stretched. Let's take this scenario for example.

You are planning to upgrade the production SQL Server to SQL Server 2016 SP1. The business needs do not allow for an in-place upgrade, so you have built a new server and are planning to migrate production database to the new server.

It could be a DR scenario but more likely the issues I am talking about will be during migrations.

The issue you need to be aware of is that after restoring the on-premises database you then need to reauthorize the connection to the Azure SQL Database (official details at https://msdn.microsoft.com/en-us/library/mt733205.aspx). When you perform this step, you have to specify the parameter WITH_COPY which can either point the database to the existing remote table in the Azure SQL Database, or create a new copy of the remote table to use. The recommended approach is to use a new copy of the remote table (with_copy = 1). I would also recommend this approach for database migrations, and then manually clean up the old table. The reason I recommend this is as I will show in this post, if your old/current database is still in use and you point a new database to the same remote table, you can experience conflicts between the data reconciliations and this will result in cold data loss.


So let's explore the issue.

Firstly here is the environment I am working in:

On-premises SQL Server 2016 SP1 (13.0.4001.0). I have one database StretchDBDemo which contains the following tables:

  • dbo.Department
    • DepartmentID, DepartmentName, OfficeLoc
  • dbo.People
    • PersonID, FullName, IsEmployee, PhoneNumber, EmailAddress

The full schema is available in the script at the end of this post.

We are going to use the dbo.People table to demonstrate this issue. So lets start with some data.
INSERT INTO [dbo].[People] ([PersonID], [FullName], [IsEmployee], [PhoneNumber], [EmailAddress]) VALUES (1, 'Matt', 1, '0','yourname@email.com');
INSERT INTO [dbo].[People] ([PersonID], [FullName], [IsEmployee], [PhoneNumber], [EmailAddress]) VALUES (2, 'Steve', 0, '0','yourname@email.com');

Next step is to setup StretchDB feature. This has to be done through the GUI and is pretty straight forward but here are the steps I have used:

  1. Right click on the Database StretchDBDemo in Object Explorer
  2. Select Tasks > Stretch > Enable

    1. In the GUI select Next
    2. Place a tick in the box next to the dbo.People table. Notice the warning icon. Important to note as it does have some relevance to the behaviour we will explore.
    3. Click the "Entire Table" link under the Migrate column to launch the filter wizard

      1. Setup a filter called IsEmployee False, with the predicate "IsEmployee = 0". Click the Check button and then Done.

        NOTE: If you don't have any rows in the dbo.People table that match this predicate you won't be able to proceed past this point.
    4. Click Next and then authenticate to Azure. 
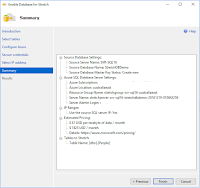
    5. Select either an existing Azure SQL Database Server or create a new StretchDB server.
    6. Follow the wizard to completion. I recommend taking a screen snippet of the summary page for reference.
  3. You can then check that the StretchDb feature is working by using the Monitor from the Stretch menu on the Database object.


    You could also query the following tables to check this data manually
    SELECT * FROM sys.dm_db_rda_migration_status
    SELECT * FROM sys.dm_db_rda_schema_update_status
    
  4. You will need to check the configuration of the StretchDb, this is critical as we need the Azure SQL Server address.

    -- the db config
    SELECT * FROM sys.remote_data_archive_databases
    -- the tables config
    SELECT * FROM sys.remote_data_archive_tables
    -- the data source
    SELECT * FROM sys.external_data_sources
    
  5. Now that you have the remote server's address, in SSMS Object Explorer connect to the Azure SQL Database server
    1. Expand the Databases branch in Object Explorer, expand your stretched remote database (the name is in the tables queried above). Then expand Tables. Note how no tables are displayed here. Any stretched tables are deliberately hidden and you should not query those tables in general practice. However we are troubleshooting/demonstrating an issue so we will query the tables directly.
    2. Query sys.Tables to find the name of the stretched table
    3. Now query the stretched Table in the Azure SQL Database. You should have 1 record for 'Steve'.
  6. Lets add a new record to our on-premises database that will be stretched to the remote server.
    INSERT INTO [dbo].[People] ([PersonID], [FullName], [IsEmployee], [PhoneNumber], [EmailAddress]) VALUES (3, 'Chris', 0, '0','yourname@email.com');
    
  7. Using the Monitor or the TSQL queries from earlier check on the status of the StretchDb feature. After some time query the stretched table in the Azure SQL Database again to make sure the new record is stretched there.


Now the fun part starts. Lets simulate a database migration. In my lab I am just using the same server, but the experience is the same.
  1. Take a backup of the on-premises StretchDbDemo database. You could elect to disable StretchDb first and bring all the data back on-premises, but we trust the Azure backups to keep our data in the cloud safe.
  2. Next restore the backup to the new database we are migrating the application to. I have used the database name StretchDbDemoNew.
  3. Once the database is restored it isn't immediately Stretching database as it needs to be re-authorized to use the remote server. This is outlined in https://msdn.microsoft.com/en-us/library/mt733205.aspx.
    1. First get the name of the credential that exists. If you were migrating this to another server you will need to recreate the credential on that server. The name of the credential needs to match the remote server address.
      SELECT * FROM sys.database_scoped_credentials
    2. Now use the following statement to
      -- reauthorize using the existing credential information
      USE [StretchDBDemoNew];
      GO
      EXEC sp_rda_reauthorize_db 
        @credential = N'',
        @with_copy = 0;
      GO
      

Here is where the problem begins. 
When you execute sp_rda_reauthorize_db and specify with_copy = 0, it uses the existing Azure SQL Database as the endpoint. So now we actually have two on-premises databases StretchDBDemo and StretchDBDemoNew, both pointing to the same Azure SQL Database table for stretched data. If you specify with_copy = 1, it actually creates a copy of the data in a new table and therefore the old and new on-premises databases have different stretch data end-points.

So why does this matter. Well lets add some data to the new on-premises database because well we want to make sure it's all work as you would in any migration.

INSERT INTO [StretchDBDemoNew].[dbo].[People] ([PersonID], [FullName], [IsEmployee], [PhoneNumber], [EmailAddress]) VALUES (10, 'Bill', 0, '0','yourname@email.com');

HINT: Any rows I insert into the new database I will use a PersonID >= 10 as this helps with the demonstration.

Now this should get stretched to the Azure SQL Database. So switch to that query window and check it's there. 
NOTE: it might take a few minutes for the reconciliation to occur.


Here is where things get interesting. After a few minutes try querying the data again and see if there is any change. While writing this post the remote record disappeared, however when writing the scripts it didn't. So what is happening..... to find out lets compare local and remote data more.

With the new record still in Azure, query the old on-premises database. If your lucky you will find the record inserted into the new database which has been stretched to Azure also returned when you query the original database. Your experience here may differ as it's all a matter of timing.


Just to add fuel to the fire I inserted another record into my new database that would be stretched to Azure.

INSERT INTO [StretchDBDemoNew].[dbo].[People] ([PersonID], [FullName], [IsEmployee], [PhoneNumber], [EmailAddress]) VALUES (11, 'Bart', 0, '0','yourname@email.com');


But what about our existing on-premises database. Remember in my scenario we are only testing the migration so you would assume there are still active connections querying that database and potentially data being updated which would then stretch into Azure. So lets insert two records into that database which will be stretch.

INSERT INTO [StretchDBDemo].[dbo].[People] ([PersonID], [FullName], [IsEmployee], [PhoneNumber], [EmailAddress]) VALUES (4, 'Chad', 0, '0','yourname@email.com');
INSERT INTO [StretchDBDemo].[dbo].[People] ([PersonID], [FullName], [IsEmployee], [PhoneNumber], [EmailAddress]) VALUES (5, 'Dan', 0, '0','yourname@email.com');

So in our existing database we now have this data being returned


What about in our new database.


Wait a minute, those records 'Chad' and 'Dan' were just inserted into our existing database, and where did our records for 'Bill' and 'Bart' go. 

Here is the issue, with both on-premises databases pointing to the same remote database through the with_copy = 0 option, it means that the reconciliation processes in the databases will conflict. One of the databases will effectively become the master and overwrite what records the other sends. As I mentioned both times I ran through the scripts I got different experiences where one time the new database was the master, and the other time (writing this blog) the original database was the master and overwrote the records.

So, the good news is that if you use with_copy = 1 option then the databases use separate remote tables and therefore do not conflict. So my recommendation is ALWAYS USE "WITH_COPY = 1" when reauthorizing a database to the remote server.

In saying that a few things to keep in mind, over time if you move the database a lot you could end up with lots of tables in the remote database so best to monitor that if you want to keep your costs down.

Also if at any stage you are querying the stretched tables in the on-premises databases and you have this conflict situation you could experience a number of cases of this error.


I hope this blog post helps when it comes time to planning your migrations. Any questions or feedback please leave them in the comments section. 

Get the complete demo scripts here.

Legal Stuff: The contents of this blog is provided “as-is”. The information, opinions and views expressed are those of the author and do not necessarily state or reflect those of any other company with affiliation to the products discussed. This includes any URLs or Tools. The author does not accept any responsibility from the use of the information or tools mentioned within this blog, and recommends adequate evaluation against your own requirements to measure suitability.

Sunday, August 21, 2016

New SQL Server Builds API.... improve your health checks with version and support information

Things have been a bit busy for me personally over the last few months but that is another story. What I have done is use some of this time to get back to a little project I started a while back.

Introducing the SQL Server Builds API..... providing version information including release dates, and known support life-cycle information.


Overview
The SQL Server Builds API provides SQL Server Version information and known support life-cycle information. As it is a personal project of mine the data is currently manually maintained based on known sources. The main objective of the tool is to enhance health check and project planning type processes, it is not intended for licensing or other legal auditing processes.

In prior roles and particularly in my current role one of the most common checks I perform on a SQL Server is the version and also the patching process. To aid in this what I would do is run reports based off my own custom database of version numbers to check and validate the version of the instance being checked.


Querying the API
To query the API it is pretty simple. The base URI is http://sqlserverbuildsapi.azurewebsites.net/api/SQLVersions

The API takes two parameters

  • Version - This is a string representation of the version of your SQL Instance returned by SELECT SERVERPROPERTY('PRODUCTVERSION') e.g. '12.00.2342.00'
  • MissingUpdates - A boolean value (True/False) of if to include any updates released since the current patch level in the results

So if I wanted to query for information about the version number 12.00.2342.00 my completed URI would be something like:

http://sqlserverbuildsapi.azurewebsites.net/api/SQLVersions?Version=12.00.2342.00&MissingUpdates=false

NOTE: The MissingUpdates param defaults to false so you could omit it from the URI above.


Where the data comes from
The official source of truth with life-cycle data has to be Microsoft Support Life-cycle (https://support.microsoft.com/lifecycle), and this API/tool is by no means trying to replace that. In fact if you are doing any official auditing for licensing or any other legal means you MUST use that source over this API's data. At least perform your own validation of the data for each record.

Most DBA's and SQL admins would refer to http://sqlserverbuilds.blogspot.com.au. I am no different and I would previously refer to that site as well. So, it is only natural that it is still one of the sources I go to for building my API's database.

The database behind this API is currently manually maintained, and even if it was somewhat automated mistakes can happen. If you find I am missing any updates, or if there is any incorrect data please make sure you reach out and let me know.


Suggestions for using the API
The API could be used in any number of tools and checks. Here are just some I can think of:
  • Custom health check scripts
  • Enhance on-premise CMDB data
  • PowerBI reports
  • Other custom Applications that interface/manage SQL Server instances

PowerShell Examples

#1 - Get version information (static version number)
# Set the version number to test
$VersionNumber = '12.00.2342.00' # SQL 2014

# Call the API to get the version information
$VersionData = Invoke-RestMethod -Uri "http://sqlserverbuildsapi.azurewebsites.net/api/SQLVersions?Version=$($VersionNumber)";

# at this point simply return the $VersionData variable for the raw info
$VersionData

# Want to improve your Health Check script, calculate the health of Support Status
if ($VersionData.ExtendedSupportEnd -le (Get-Date)) {$SupportStatus = 'Critical'}
elseif ($VersionData.MainstreamSupportEnd -le (Get-Date)) {$SupportStatus = 'Warning'}
else {$SupportStatus = 'Ok'}

# format the output data string
$OutputData = @"
Instance = $($Instance.Name)
Version = $($VersionData.Version)
Product = $($VersionData.Product)
Branch = $($VersionData.Branch)
Update = $($VersionData.Update)
MainstreamSupportEnd = $($VersionData.MainstreamSupportEnd)
ExtendedSupportEnd = $($VersionData.ExtendedSupportEnd)
SupportStatus = $($SupportStatus)
"@

# Return the hashtable
ConvertFrom-StringData -StringData $OutputData;


#2 - Get Missing updates (static version number)
# Set the version number to test
$VersionNumber = '11.00.2342.00' # SQL 2012

# Call the API to get the known missing updates (released since current version)
$VersionData = Invoke-RestMethod -Uri "http://sqlserverbuildsapi.azurewebsites.net:80/api/SQLVersions?Version=$($VersionNumber)&MissingUpdates=$true";

# return the output, it is already formated as an Array
$VersionData

# or as a table
$VersionData | Format-Table -Property Version,Branch,Update,@{Name="Released";Expression={Get-Date $_.Released -Format 'yyyy-MM-dd'}},Description -AutoSize


Other Examples
There are more examples in my GitHub repository - https://github.com/Matticusau/SQLServerBuildsAPI-Examples

Including:

  • Simple static value examples like above
  • Both Single and Multiple Instance examples with live version number data direct from a SQL Instance
  • c# Windows Form client
Just want to see it in action, I have an MVC form available at https://sqlserverbuildsportal.azurewebsites.net


Where is the source code for the API
At this time I am not making the API opensource.


Want to partner with me
This is a personal project. If you have a similar project or a project that you would like to use this API in please reach out and lets improve the world together.

If you have any questions around this API please make sure you comment or reach out to me through any of my contact means.

Legal Stuff: The contents of this blog is provided “as-is”. The information, opinions and views expressed are those of the author and do not necessarily state or reflect those of any other company with affiliation to the products discussed. This includes any URLs or Tools. The author does not accept any responsibility from the use of the information or tools mentioned within this blog, and recommends adequate evaluation against your own requirements to measure suitability.


Friday, April 15, 2016

TSQL To identify queries which are candidates for Parameterization

While discussing the concepts of 'optimize for ad hoc workloads' and 'Forced Parameterization' in SQL Server I decided to modify an existing query I wrote to analyse the query performance from the cache (more on it here) to now analyse the adhoc queries for candidates which could benefit from parameterization.

;WITH CTE(QueryCount, StatementTextForExample, plan_handle, QueyHash, QueryPlanHash, CacheObjType, 
    ObjType) 
AS 
( 
   SELECT
    COUNT(query_stats.query_hash) AS QueryCount
    , MIN(query_stats.query_text) AS StatementTextForExample
    , MIN(query_stats.plan_handle) AS plan_handle
    , query_stats.query_hash AS QueryHash
    , query_stats.query_plan_hash AS QueryPlanHash
    , query_stats.CacheObjType
    , query_stats.ObjType
   FROM  
       ( 
           SELECT  
      qs.query_hash
      , qs.query_plan_hash 
      , qs.plan_handle
      , cp.cacheobjtype as [CacheObjType]
      , cp.objtype as [ObjType]
      , SUBSTRING(qt.[text], qs.statement_start_offset/2, ( 
                   CASE  
                       WHEN qs.statement_end_offset = -1 THEN LEN(CONVERT(NVARCHAR(MAX), qt.[text])) * 2  
                       ELSE qs.statement_end_offset  
                   END - qs.statement_start_offset)/2  
               ) AS query_text 
           FROM  
               sys.dm_exec_query_stats AS qs 
      INNER JOIN sys.dm_exec_cached_plans cp ON cp.plan_handle = qs.plan_handle
               CROSS APPLY sys.dm_exec_sql_text(qs.[sql_handle]) AS qt 
           WHERE qt.[text] NOT LIKE '%sys.dm_exec_query_stats%' 
     AND cp.objtype = 'AdHoc'
     --AND qs.last_execution_time BETWEEN DATEADD(hour,-1,GETDATE()) AND GETDATE() --change hour time frame
       ) AS query_stats 
 GROUP BY query_stats.query_hash
  , query_stats.query_plan_hash
  , query_stats.CacheObjType
  , query_stats.ObjType
 HAVING COUNT(query_stats.query_hash) > 1
) 
SELECT  
   CTE.QueryCount
   , CTE.CacheObjType
   , CTE.ObjType
   , CTE.StatementTextForExample
   , tp.query_plan AS StatementPlan
   , CTE.QueyHash
   , CTE.QueryPlanHash 
FROM 
   CTE 
   OUTER APPLY sys.dm_exec_query_plan(CTE.plan_handle) AS tp 
ORDER BY CTE.QueryCount DESC; 
--ORDER BY [Total IO] DESC; 

When you identify these candidates you then need to look at what is the most appropriate resolution such as.

  1. Rewrite the query at the application layer to ensure it is called with parameterization from the data provider
  2. Rewrite the query as a stored procedure
  3. Enable 'optimize for ad hoc workloads' on your SQL instance
    EXEC sys.sp_configure N'optimize for ad hoc workloads', N'0'
    GO
    RECONFIGURE WITH OVERRIDE
    GO
    
  4. Enable 'Forced Parameterization' on the affected database
    USE [master]
    GO
    ALTER DATABASE [AdventureWorksPTO] SET PARAMETERIZATION SIMPLE WITH NO_WAIT
    GO
    
Of cause the appropriate option really depends on a larger view of your environment and applications that only you can determine. If you do have any thoughts on this please feel free to add them to the comments below to help others.

Word of caution too. Before adjusting any sp_configure settings with RECONFIGURE make sure you run the following to check for any settings which are not yet active. It is expected to see 'min server memory (MB)' in the results of this though if you leave the setting default at 0 as SQL must reserve the minimum memory possible which is 16mb.
SELECT * FROM sys.configurations
WHERE Value <> value_in_use


Legal Stuff: The contents of this blog is provided “as-is”. The information, opinions and views expressed are those of the author and do not necessarily state or reflect those of any other company with affiliation to the products discussed. This includes any URLs or Tools. The author does not accept any responsibility from the use of the information or tools mentioned within this blog, and recommends adequate evaluation against your own requirements to measure suitability.


Wednesday, March 23, 2016

PowerShell: Finding commands (functions) with Risk Mitigation capabilities

Yesterday I was talking to a workshop about implementing Risk Mitigation capabilities into your own Advanced Functions in PowerShell. This got me thinking about how to identify the commands that have that capability enabled. More importantly the configuration of the ConfirmImpact setting.

Background:
If you don't know PowerShell uses a number of inputs when determining how the Risk Mitigation capabilities are applied.
For the WhatIf capability it is purely the presence of the -WhatIf switch parameter.
For the Confirm capability it is a combination of the ConfirmImpact value in the [CmdLetBinding()] attribute and the $ConfirmPreference variable value. Or the presence of -Confirm parameter

The following command we show all commands with the RiskMitigation capability.
Get-Command | Where-Object {$PsItem.Parameters.Keys.Count -gt 0 -and $PsItem.Parameters.ContainsKey('WhatIf')}


We can extend this further to retrieve the ConfirmImpact value however this is not exposed through a Parameter on the command object and can only be retrieved from the source definition. Unfortunately for CmdLets this is not exposed as they are compiled. This will work though for Functions so you can check your own commands etc.

Get-Command -CommandType Function | `
   Where-Object {$PsItem.Parameters.Keys.Count -gt 0 -and $PsItem.Parameters.ContainsKey('WhatIf')} | `
   Select-Object -Property Name,CommandType,@{Name="Impact";Expression={[Regex]::Match($PSItem.Definition, "(ConfirmImpact='(?<impact>.{1,})'{1})").Groups["Impact"].Value}}


This pipeline command uses the RegEx type accelerator and Match static member but similar could be achieved with the -Match operator.


Legal Stuff: As always the contents of this blog is provided “as-is”. The information, opinions and views expressed are those of the author and do not necessarily state or reflect those of any other company with affiliation to the products discussed. This includes any URLs or Tools. The author does not accept any responsibility from the use of the information or tools mentioned within this blog, and recommends adequate evaluation against your own requirements to measure suitability.

Wednesday, March 2, 2016

PowerShell ISE add-on to toggle collapsible sections in all files

UPDATE 03/03/2016: It's amazing how quickly this went from a simple script to within an hour yesterday becoming a Module and now released on PowerShellGallery and GitHub. Check out the instructions here to install this.
---------------

One feature I am hoping to see in the PowerShell ISE is the state of collapsed sections to be maintained for "recent" files. It is just annoying when you have a very large file that you are regularly working on to have to collapse all the sections you had previously collapsed each time you open it up..... anyway you can vote on that idea here.

If you didn't know there is a keyboard shortcut CTRL+M which will toggle the collapsed sections for the current file. Handy little gem that one. We can also programmatically invoke this method with:

$psISE.CurrentFile.Editor.ToggleOutliningExpansion()

This got me thinking, I can easily write an function that itterates through each open Tab/File and collapses it. Even better I can wrap that up into an add-on for the ISE.

I've added a menu item and also the keyboard shortcut CTRL+SHIFT+M to implement this.

Save the following code into your Profile script and enjoy!

#requires -Version 4
<#
    Script:     ISEColapseAllFiles.ps1
    Author:     Matt Lavery
    Created:    02/03/2016
    Version:    0.0.1
    
    Change History
    Version    Who          When           What
    --------------------------------------------------------------------------------------------------
    0.0.1      MLavery      02/03/2016     Initial Coding
    
#>

<#  
    .SYNOPSIS
        Toggles the state of all expandable sections in all open files within the ISE

    .DESCRIPTION
        Toggles the state of all expandable sections in all open files within the ISE
        Works across PowerShell Tabs.
        Implements the keyboard shortcut CTRL+SHIFT+M and a menu item in the Add-ons menu.
#>
function Set-ISECollapseAllFiles
{
    [CmdletBinding()]
    Param()

    Foreach ($psISETab in $psISE.PowerShellTabs)
    {
        Write-Verbose "PS Tab: $($psISETab.DisplayName)";
        foreach ($psISEFile in $psISETab.Files)
        {
            Write-Verbose "PS File: $($psISEFile.DisplayName)";
            $psISEFile.Editor.ToggleOutliningExpansion()
        }
    }
}

# remove the existing menu item if it exists
if ($psISE.CurrentPowerShellTab.AddOnsMenu.Submenus.DisplayName.Contains('Toggle Colapse All Files'))
{
    $psISE.CurrentPowerShellTab.AddOnsMenu.Submenus.Remove(($psISE.CurrentPowerShellTab.AddOnsMenu.Submenus.GetEnumerator() | Where-Object DisplayName -EQ 'Toggle Colapse All Files'));
}
# add the add-on menu
$psISE.CurrentPowerShellTab.AddOnsMenu.Submenus.Add('Toggle Colapse All Files',{Set-ISECollapseAllFiles},"CTRL+SHIFT+M");


Legal Stuff: As always the contents of this blog is provided “as-is”. The information, opinions and views expressed are those of the author and do not necessarily state or reflect those of any other company with affiliation to the products discussed. This includes any URLs or Tools. The author does not accept any responsibility from the use of the information or tools mentioned within this blog, and recommends adequate evaluation against your own requirements to measure suitability.

Thursday, February 25, 2016

Generating Certificates for Desired State Configuration lab/test environments

A colleague pointed out to me today that it has been a long time since I blogged, and you know what he is right as I have mostly been posting tweets about interesting news. Given I was taking some colleagues through setting up a Desired State Configuration lab environment and ran into an issue with the certificates we were trying to use, and to make it worse the issue is something I have faced in the past but forget due to time lag, this seems like a great topic to blog about.

Now a search in your favorite search engine would show that this is not an uncommon problem but there isn't many who answer it plain and simple.

Do not use New-SelfSignedCertificate to generate a certificate for testing DSC deployments (encrypting credentials) on Windows 2012 R2 or you will most likely receive the error:

    The private key could not be acquired.
        + CategoryInfo          : NotSpecified: (root/Microsoft/...gurationManager:String) [], Ci
       mException
        + FullyQualifiedErrorId : MI RESULT 1
        + PSComputerName        : localhost


Solution #1: Download and use the script/function from Script Center - https://gallery.technet.microsoft.com/scriptcenter/Self-signed-certificate-5920a7c6
 

Solution #2: Generate the certificate with MakeCert.exe from the Visual Studio Command Prompt.

For example, to make a certificate called DSCDemo.

    makecert.exe -r -pe -n "CN=DSCDemo" -sky exchange -ss my -sr localMachine
Further info on makecert can be found at https://msdn.microsoft.com/library/bfsktky3%28v=vs.100%29.aspx

The background, I was trying to setup a DSCPull server with configuration for installing a SQL Server Instance using xSqlPs. This required a Credential to be stored in the config for the 'sa' account, which clearly needed to be encrypted as I didn't want to use plain text passwords in the DSC Configuration. We tried all sorts of methods for exporting the certificate from the DSCPull but eventually the clue was in the fact that even on the DSCPull server the certificate reported no Private Key data in the properties.


    PS C:\Users\mattl> get-item Cert:\LocalMachine\my\{thumbprint} | fl *
    ...

    Extensions               : {System.Security.Cryptography.Oid, System.Security.Cryptography.Oid,
                               System.Security.Cryptography.Oid, System.Security.Cryptography.Oid}
    FriendlyName             : DSCDemo
    IssuerName               : System.Security.Cryptography.X509Certificates.X500DistinguishedName
    NotAfter                 : 2/25/2017 4:02:31 AM
    NotBefore                : 2/25/2016 3:42:31 AM
    HasPrivateKey            : True
    PrivateKey               :
    PublicKey                : System.Security.Cryptography.X509Certificates.PublicKey
    ...

    Issuer                   : CN=DSCDemo
    Subject                  : CN=DSCDemo

Again the clue here was the fact that the Private Key isn't even displayed on the server where it was generated, so we know there is nothing wrong with the export/import, but actually a problem with the way it was generated.

A couple of searches and I found the blog post I used last time I faced this issue, yep isn't that annoying. Turns out this is a problem with the New-SelfSignedCertificate cmdlet and when you generate the certificate with MakeCert.exe as per above the Private Key data is visible on the server it is generated on and also on the server it is imported on (as long as you export the private key data too).

Hope this helps a few others, or at least helps me remember next time I face this problem before I waste a few hours trying to figure it out again ;)
 

BTW in other news did you see the post that WMF 5.0 (aka PowerShell v5) RTM has been re-released. Happy days.

Legal Stuff: As always the contents of this blog is provided “as-is”. The information, opinions and views expressed are those of the author and do not necessarily state or reflect those of any other company with affiliation to the products discussed. This includes any URLs or Tools. The author does not accept any responsibility from the use of the information or tools mentioned within this blog, and recommends adequate evaluation against your own requirements to measure suitability.